

Create the end-of-chapter quiz
Write open or multiple-choice questions, add media and let AI suggest questions to check what your learners have retained.
In Create a course
- Understand the structure of a course
- Create a course
- Generate a course with AI
- Import a PDF or images
- Organise chapters
- Edit a slide
- Write the avatar script
- Edit a slide visual with AI
- Add interaction questions and surveys
- Add a video
- Create the end-of-chapter quiz
- Add resources to a course
- Saving and editing with others
- Preview a course
- Publish a course
- Course settings
- Course completion rules
- Trainer rights on a course
- Manage your courses
- Export a course to PDF
Each chapter ends with a quiz. The avatar asks the questions one by one, listens to the learner's answer, then tells them whether it is accepted and why.
Before you start#
- You must be able to edit the course: see Trainer rights.
- Each chapter needs at least one complete question before the course can be published.
Find a chapter's quiz#
- Open Trainings › your course › Edit training.
- Scroll down below the chapter's last slide, to the Chapter's quiz section.
A new chapter already contains an empty question. If you have deleted all the questions in a chapter, the section disappears: click the Add content button (the +) below the last slide, then Quiz.
Write an open question#
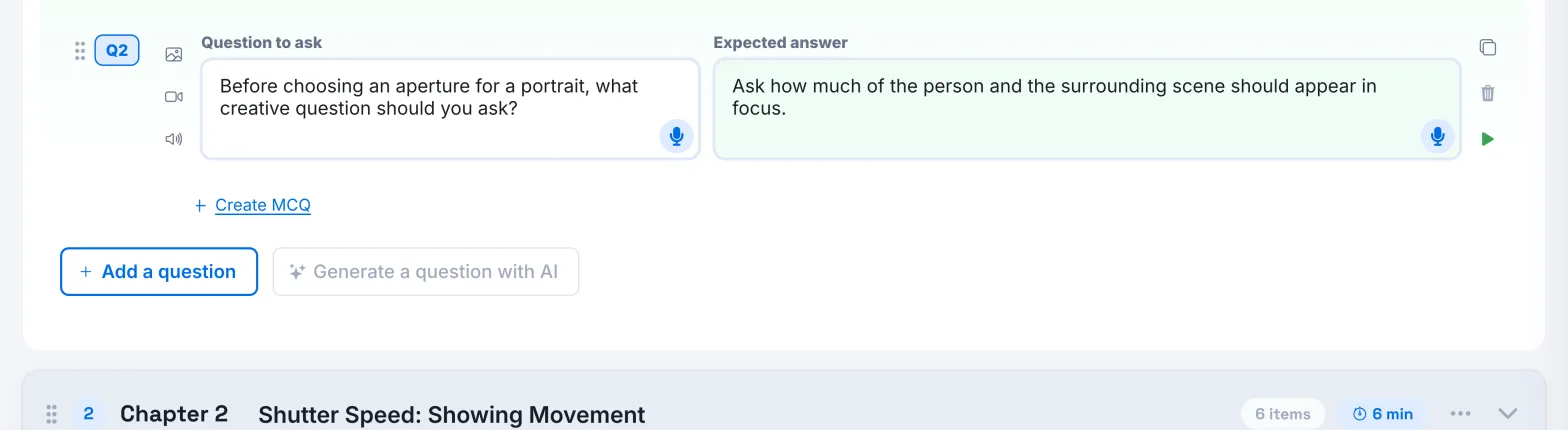
- In Question to ask, write the question the avatar will ask.
- In Expected answer, write the correct answer.
You can also dictate the text with the microphone icon in each field.
Create a multiple-choice question#
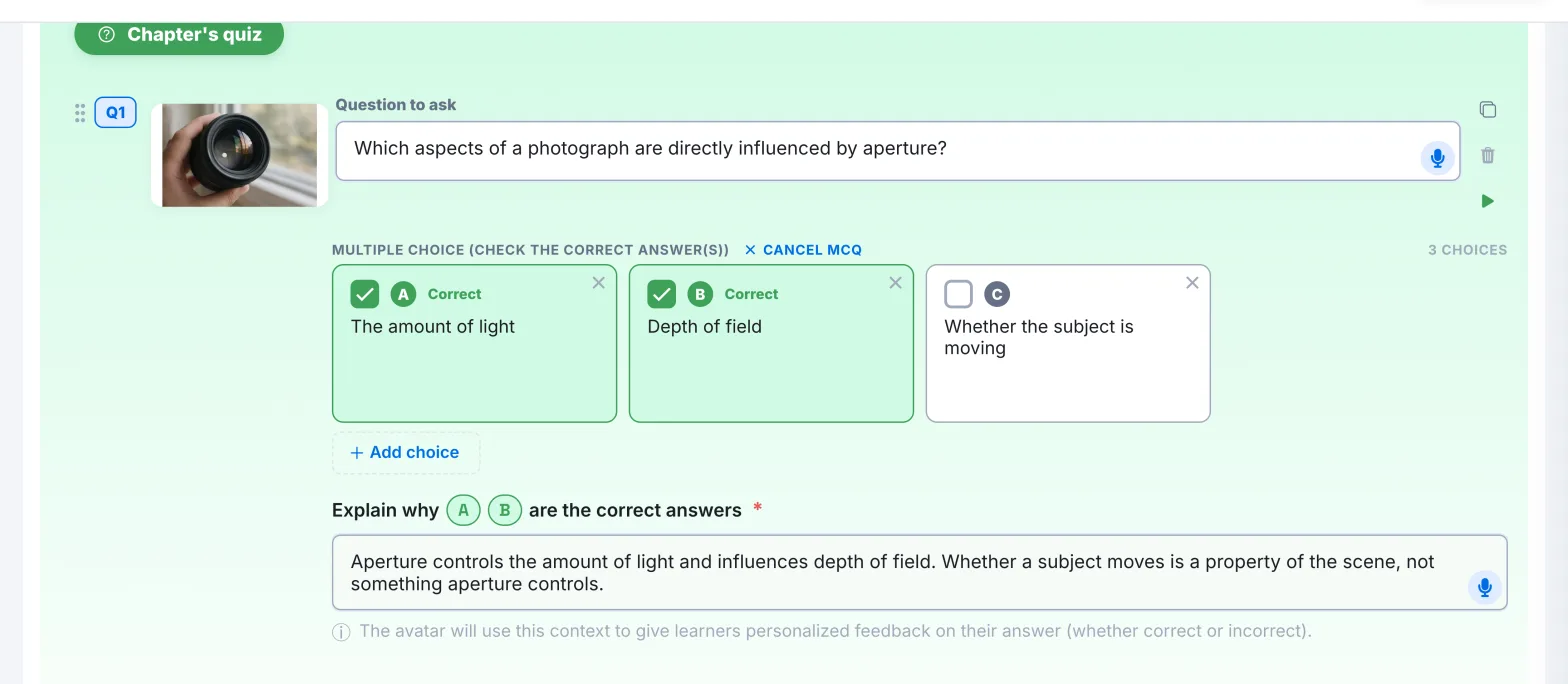
- Below the question, click Create MCQ. Two empty choices appear, A and B.
- Write the text of each choice. Add choice adds one; the cross on a choice removes it.
- Tick the box of each correct answer: it is marked Correct. Several choices can be correct.
- In the Explain why field, explain the correct answer.
This explanation is required. The avatar uses it to give the learner personalised feedback, whether their answer is right or wrong.
To go back to an open question, click Cancel MCQ. The explanation text then becomes the expected answer.
How the avatar assesses answers#
- For an open question, the avatar compares the learner's answer with your expected answer. It states clearly whether it accepts it. If not, it explains what is missing or inaccurate.
- For a multiple-choice question, the learner can answer with the letter, the text of the choice, or both. Their answer is only accepted if they give all the correct answers and no wrong ones.
This verdict counts towards the quiz score, which is compared with the passing threshold: see Completion rules. After answering, the learner sees your expected answer, or your explanation for a multiple-choice question.
Add media#
Each question can display an image, a video or an audio file.
- Below the question number (Q1, Q2…), choose Add an image, Add a video or Add audio.
- For an image or an audio file, drag the file into the window or click to choose it.
- For a video, paste its link in Video URL (YouTube, Vimeo…) or add an MP4, WebM or MOV file. Then click Save.
Once the media is added, Replace and Delete let you change or remove it. Expand shows an image or a video in a larger view.
When you publish, Complement analyses the images in your questions so that the AI tutor understands what they show. For a multiple-choice question with a video or an audio file, the learner first views the media, then answers.
Generate a question with AI#
Click Generate a question with AI below the chapter's questions. The AI reads the scripts of the chapter's slides and adds an open question with its expected answer, taking the existing questions into account. Review it, then adjust it or turn it into a multiple-choice question.
Organise the questions#
- Add a question adds an empty question at the end of the quiz.
- Duplicate this question creates a copy just below it.
- Delete the question asks for confirmation.
- Drag a question by the handle next to its number to change its order, or to move it to another chapter.
- Test from here (training preview) starts the preview from this question.
Was this article helpful?
Thank you for your feedback!
Thank you. Tell us what is missing through Help and support in the app, and we will complete the article.